Goal of this guide
At the end of this guide, you should hopefully have a working setup that allows you to multitrack your Polyend Tracker Mini / Tracker+ / Play+ on Windows by using VB-Matrix instead of ASIO4ALL.
This is not gonna be a quick one, so go grab something to drink and make sure you have some time put aside. ![]()
Update: this is now also available as a video if you prefer that:

Some History
Windows has always been bad when it comes to audio flexibility.
If you want to use multiple audio devices as one (an aggregate device) or at the same time, there is no native solution to Windows and currently there is no such feature anywhere in sight either. All of this isn’t made easier by Windows supporting a multitude of different audio drivers (MME, KS, WDM, WASAPI and good ol’ faithful ASIO).
Until recently the only way to combine different devices was using ASIO4ALL.
Which may or may not work well for you, but most definitely lacks configurability.
With this guide i hope to present an alternative that may work better for you.
Introducing Matrix
VB-Audio Matrix and Matrix Coconut are the new kids in town, by the developers behind well known software like Voiceemeter and Virtual Audio Cable. No doubt most Windows users that deal with audio or have dabbled with streaming, will have come across one of these two applications at some point or another.
Matrix allows you to create a highly customizable aggregate device (or multiple) that can be a collection of hardware devices, applications, DAWs or even network devices.

First things first - there are two versions of VB-Audio Matrix:
The main difference between the two is the amount of inputs/outputs and interface types that are available to you:


If you want to take advantage of all the available channels on the Tracker Mini, Tracker+ or Play+ you will have to use Matrix Coconut, as it is the only version that supports Windows Input Devices with 32 and/or 64 channels - which the Polyend devices fall under.
Both applications are Donationware. What does that mean?
Let me quote their website:
VBMatrix application is free to use without any functional limitation. You pay what you want when you want if you find it useful. After 30 days, VBMatrix About box will invite you to buy a license or continue to evaluate the program.
If you decide to buy a license, you can choose to donate either 10, 20, 35, 50 or 100 USD/EUR. Any of these amounts will give you a full license.
![]() DISCLAIMER:
DISCLAIMER:
I am not affiliated in any way nor do i receive anything for recommending this application.
I’m sharing this purely because it’s an awesome alternative to the much dreaded ASIO4ALL and it has worked really well for me.
Installation / Preparation
With that all out of the way. Let’s install Matrix Coconut and set everything up ![]() .
.
Running ASIO4ALL and VB-Matrix at the same time has potential to cause issues / weird behaviours.
So i recommend to uninstall ASIO4ALL first, before trying VB-Matrix.
Installation
This is straight forward:
- Download the latest version from the website: VB-Audio Matrix Coconut
- Follow the installation instructions and reboot the machine when it’s done.
Setting up Windows
Once you restarted, you may notice that you have a lot of new playback devices:

If you are like me, you probably won’t need this many (or any at all), so let’s go ahead and disable the majority of those, so they don’t clutter your view of your audio devices.
Since the Sound Settings have changed between Windows 10 and 11, i’m just going to simplify this for us all and i’ll ask you to:
- Open a Run Window - press
WIN + R - Type the following command:
mmsys.cpl soundsand press Enter on the keyboard or click OK.
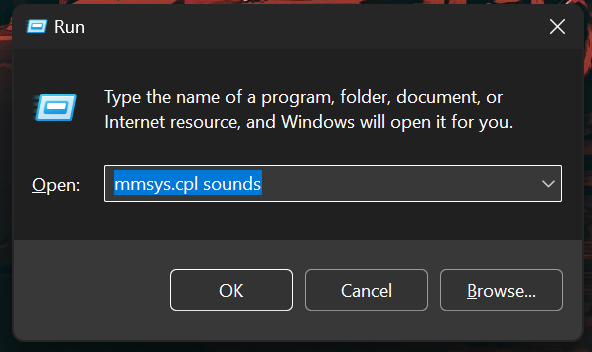
This should open up the Sound Settings window, in which you’ll see up to eight VBMatrix In devices:

Go ahead and disable as many as you like, i personally keep one around.
You can do that by right-clicking on a playback device and clicking Disable:

The same applies for your Recording Devices. VB-Matrix will have added up to eight VBMatrix Out devices. Go ahead and disable as many as you like there as well.
During Installation, your default playback device most likely was changed (thanks Windows! ![]() ).
).
So go ahead and set that back to whatever device it was previously. In my case it’s my RME Interface Output. It’s the same procedure, right-click on the device and choose Set as Default Device:

This way everything should be back to normal.
Congratulations ![]() .. we are back to square one
.. we are back to square one ![]()
Keep the Sound Settings window open though, we will still need it probably.
Setting up Tracker Mini / Tracker+ / Play+
If you are using the Tracker+ or the Tracker Mini (starting from v2.0) you’ll have to make sure that you have USB Audio correctly setup.
- On the device, go to
Config→USB→Audio - Choose
Input + Outputand confirm that selection
Sidenote: A little confusingly (atleast to me) -
Inputrefers to the channels that are sent out (for multitracking) from the device, whileOutputrefers to whatvever is sent back in for “output” of the line-out of the device.
Hence why just choosingInput + Outputwill prevent you from getting just as confused as me
If you are using the Tracker Mini (Firmware 1.1) or the Play+ there is nothing you’ll have to do, besides connecting your device via USB to your computer.
In your Sound Settings window (you kept it open right? ![]() ), you should see your device.
), you should see your device.
Either on the Playback or the Recording Tab. In my case i’ll demonstrate this with the Tracker+ :

Your device may or may not be enabled, as seen above. If it is disabled, make sure to enable it by right-clicking and choosing Enable. Do this atleast for the Recording Tab. Playback is optional in case you want to route audio back out of your Polyend device.
Starting Matrix
We finally made it to where we can actually start using Matrix!
I’ve personally set Matrix to not autostart during Windows Startup and i don’t remember if it does autostart by default. So here’s a couple things you can check if it is running or not:
Check if you have a Tray-Icon for Matrix:
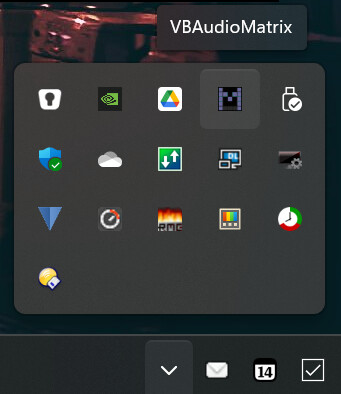
If so, you should be able to just left-click it, to open the main window.
If this icon does not exist, Matrix is most likely not loaded yet, so go ahead and find it in your startmenu and click it.
Be aware that Coconut installs both versions of Matrix:
- The regular one and Coconut.
- So make sure that you start the one titled
VBAudioMatrix Coconut x64. - If you still need 32-bit, there is also
VBAudioMatrix Coconut.
If you did that and the application doesn’t open, check your Tray. Depending on the default settings, the application could be set to not open the main window on start.
Matrix Overview
With that out of the way, you should see the following:

Let’s familiarize ourselfs with the interface. On the left side of the application you’ll have a title that indicates what each individual “zone” takes care of.
- ASIO Devices: These will be your physical audio interfaces or hardware devices that support ASIO or have an ASIO driver installed.
- Windows Devices: This will be any device that does not support ASIO. This is also where you will configure/find your Polyend devices.
- VAIO: remember those VBMatrix In/Out devices from earlier? Yeah, that’s those.
- VBAN Streams: This is a network protocol that could be used for over the network communication between multiple computers.
- Virtual ASIO: This will be where we create our aggregated devices.
You may have noticed that there are numbers next to the names of the individual slots.
Like ASIO32, ASIO512, WIN1.IN, WIN32.IN, WIN64.IN, VASIO8, VASIO64, VASIO128 etc.
These indicate how many channels one slot supports. If there is no .IN or .OUT attached to the name, that means it has an equal amount of in or out channels.
There is one exception here to this rule and that is WIN1 up until WIN8.
Each of these support 8 channels. WIN32 and WIN64 however do support - as their names imply - 32 and or 64 channels.
Last but not least there is the CLOCK slot with the yellow MASTER badge. By default Matrix uses its own internal clock to sync all devices, this can be changed to be either a Windows device or any ASIO device that you connect. But based on my experience, leaving it as is, seems to work best.
Matrix Device Setup
Now let’s get to it and setup your Polyend device. ![]()
In my case i will combine it with my RME Interface. If you have an ASIO enabled interface yourself, this process should be the same, except that you will choose a different device of course.
If you don’t have an audio interface, you can use WIN1.OUT instead and choose whatever audio output device you have available. This could either be the playback channels of your Polyend device or any integrated soundcard. I’ll guide you through both:
Setup with an ASIO Interface
Let’s add our interface first to the Matrix.
- Choose an appropriate ASIO Slot that has enough channels for your device.
- In my case my interface supports up to 32 channels plus an additional two channels as a main output, for a total of 32 in and 34 out channels. Hence i’m going to be choosing
ASIO64A. - To select the device
CTRL+Left-Clickonto the Slot where it says CTL+Click here to select Device
This should open a window for ASIO device selection:

You should see all available ASIO devices that are installed on your computer. Make sure to choose the one appropriate to you. In my case i’m choosing the ASIO MADIface USB device.
Once you have clicked on it, your slot should look similar to this:

It will automatically detect the Samplerate and Buffersize of your device and you will see all available input/output channels.
If you want to change the device or have quick access to your devices control panel, you can CTRL + Left-Click on the device name again, to open the selection window.
Setup with integrated audio card or output through the Polyend device
Let’s add an audio output device or your Polyend Device to route audio back out.
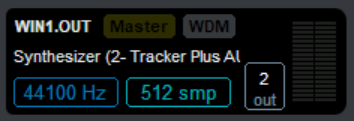
- Go to
WIN1.OUT - To select the device
CTRL+Left-Clickonto the Slot where it says CTL+Click here to select Device
This should open a window for Windows Output Device selection:

You should see all available Windows devices that are available to you. Make sure to choose the one appropriate to you. In my case i’m choosing the Tracker+. If you don’t see your device, you probably have not enabled it yet.
Once you have clicked on it, your slot should look similar to this:
If you have completed one of the two choose-your-own-adventure paths above, you should at the very least have an audio output configured and depending on your chosen path also have access to input devices already.
I will continue this guide with my regular interface, which has 32 input channels and 34 output channels and if necessary i will point out differences as needed.
At this point you might wonder about the Clock Master setting. During my tests i have noticed that using the Matrix internal Clock yields the best results. But your mileage may vary. So i’ll leave it up to you to experiment and find out what works best for you.
To change the clock master, you simple CTRL + Left-Click on the Yellow Master Badge of the desired device and it will become the new Master. So as an example, here i switched it to my ASIO device:

Let’s continue and connect your Polyend device.
- As we know, the Play+ / Mini and Tracker+ expose more than 8 channels each
- hence we need to use a
WIN32.INorWIN64.INslot.
As you may have noticed there are only two slots available with a high enough channel count.
This means that at the moment, you can only connect two Polyend devices at the same time.
There is a chance that the developers may add more of these high-channel-count slots in the future.
But we may just have to make our voice heard to them about this.
Like before, we press CTRL + Left-Click on the WIN32.IN slot so you can select your Polyend device. If you don’t see your device, you probably have not enabled it yet.
If you did everything correctly, you should see something similar to this:

There is one more device that you need to create and that is a Virtual ASIO device. This will be the aggregator. Depending on your channel count, choose the appropriate VASIO slot and activate it by clicking on its Online Badge by using CTRL + Left-Click.
For the sake of demonstration, the VASIO64A is enough at the moment (32 + 28 = 60 input channels). If i were to add a second Polyend device i’d have to use a VASIO128 slot though.
It’s usually better to use a bigger VASIO slot to future proof yourself, so you won’t have to set everything up again in the future.
Here’s where we are now:

There are two things i want you to notice here:
- Your VASIO device inherits the Samplerate and Buffersize of your Master Clock
- Have you noticed the Numbers next to the Matrix Logo on top?
These numbers indicate the amount of input and output channels that are now available to you.
Matrix Routing Setup
Now that all devices are set up, you’ll have to route them so you can actually use them. This is where the “Matrix” naming of the application comes into play (see what i did there? ![]() ).
).
Before we do that though, i would like to give you a small tip first.
Have you noticed the little grey badges next to the Master and / or Online badge?
If you CTRL + Left-Click on them you get a list of assignable colors:
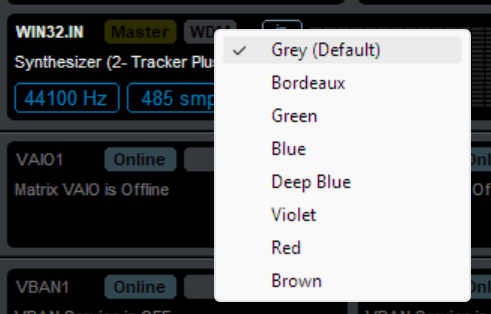
Go ahead and assign a color to each of your three devices.
It will help you to visually distinguish between your devices, for what comes next.
To create the routing on the Matrix, you have to click on “Matrix”.
Yes - the giant Matrix Title on the top next to the Logo ![]() .
.
This will present you with the following screen:


Welcome to the Matrix View ![]() . I’ve included two screenshots:
. I’ve included two screenshots:
- The first one should be the view that you see by default.
- The second screenshot is the Mini Grid View.
This is a optional view (via Options in the Menu-Navigation) that i’ve included,
so you can see all the devices are represented in this giant matrix.
The Matrix will allow you define your routes. Let’s explore the interface real quick:
- Vertically (Top to Bottom) and represented on the left, are your inputs / sources.
Meaning where sound is coming in from. - Horizontally (Left to Right) and represented on the top, are your outputs / targets.
Meaning where sound is going out to.
So as an example: if i want to map the Master Channels of my Polyend Device (usually Channel 1 + 2) to my Virtual ASIO device, it would look the like this:

You can simple create the assignment by clicking on the square of your choice and pressing the (by now familiar) CTRL + Left-Click combination. Doing this again on a square that is occupied, will remove the assignment.
While hovering over a occupied square and using CTRL + Mouse Scrollwheel you can actually affect the Gain on that channel as well. By default it is set to 0db. So whatever comes in, will also go out unaffected.
Right-clicking on a square will also give you a couple more options that are at your disposal. Explore those at your own pace (keyboard shortcuts are shown there as well).
With this knowledge, let’s go ahead and map all our available channels.
To not complicate things, i’m going to map the channels 1:1 to the Virtual ASIO for this guide.
Meaning:
- Channel 1 from the Device will also be Channel 1 on the VASIO
- Channel 2 from the Device will also be Channel 2 on the VASIO
- and so on and so forth
So your mapping should look something like this at the end:

You can create different presets as well, so experiment what fits your workflow best.
As a final step, you should also define a final routing for your personal master output, so you can hear everything. I personally use the last two channels of the VASIO device for this and route those to my output device:

Depending which device you have defined during the choose-your-own-adventure path earlier, this either is an output of your ASIO device or a WIN.OUT of a device.
At this point you can close the Matrix View and if you want you can even close Matrix to the System Tray (if you have the option enabled) or minimize it. Whichever you prefer.
Congratulation ![]()
![]() , you have succesfully setup and configured VB-Matrix.
, you have succesfully setup and configured VB-Matrix.
DAW Setup
Oh did you think we were done!? ![]()
(we are close though ![]() )
)
The final step is setting up your DAW to use the VASIO device. This will differ wildly depending on what DAW you use. As i personally use Bitwig, i can only show you how it is done there.
If you can (and found this useful), please contribute to this post by adding setup instructions for your DAW of choice. This post is editable by everyone

Ableton Setup
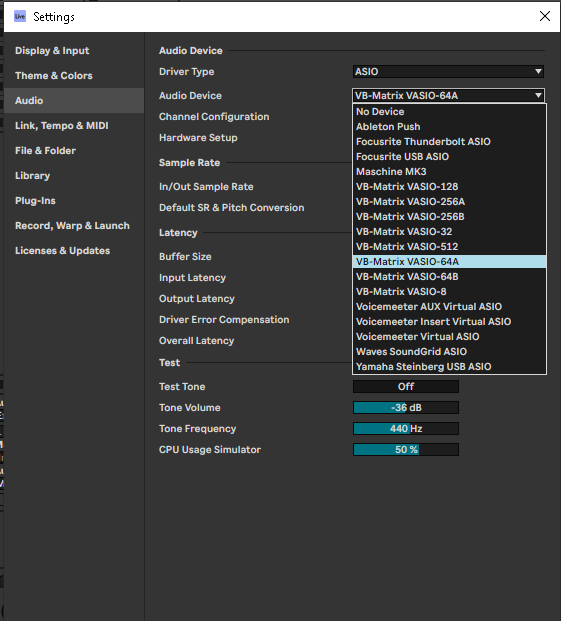
In the Ableton Audio Settings make sure to use ASIO as Driver Model.
Open the Device Dropdown and there you should find your VASIO device:
In Channel Configuration, click on Input Config and activate inputs 1/2 to 27/28 This corresponds to the channel number previously configured in the matrix section of vb-audio.
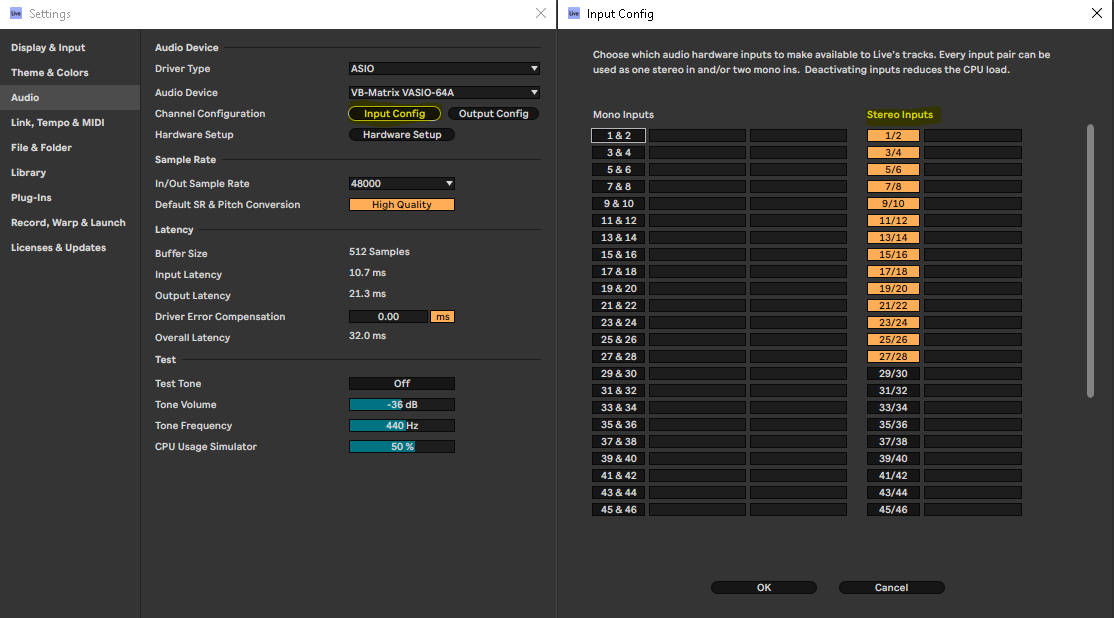
Validate, and then create the number of tracks corresponding to the Inputs created (ctrl+T) as a shortcut to creating audio tracks.
For each track, set Audio From in Ext in to 1/2 for track 1, Ext in to 3/4 for track 2, and so on up to 27/28 for track 15
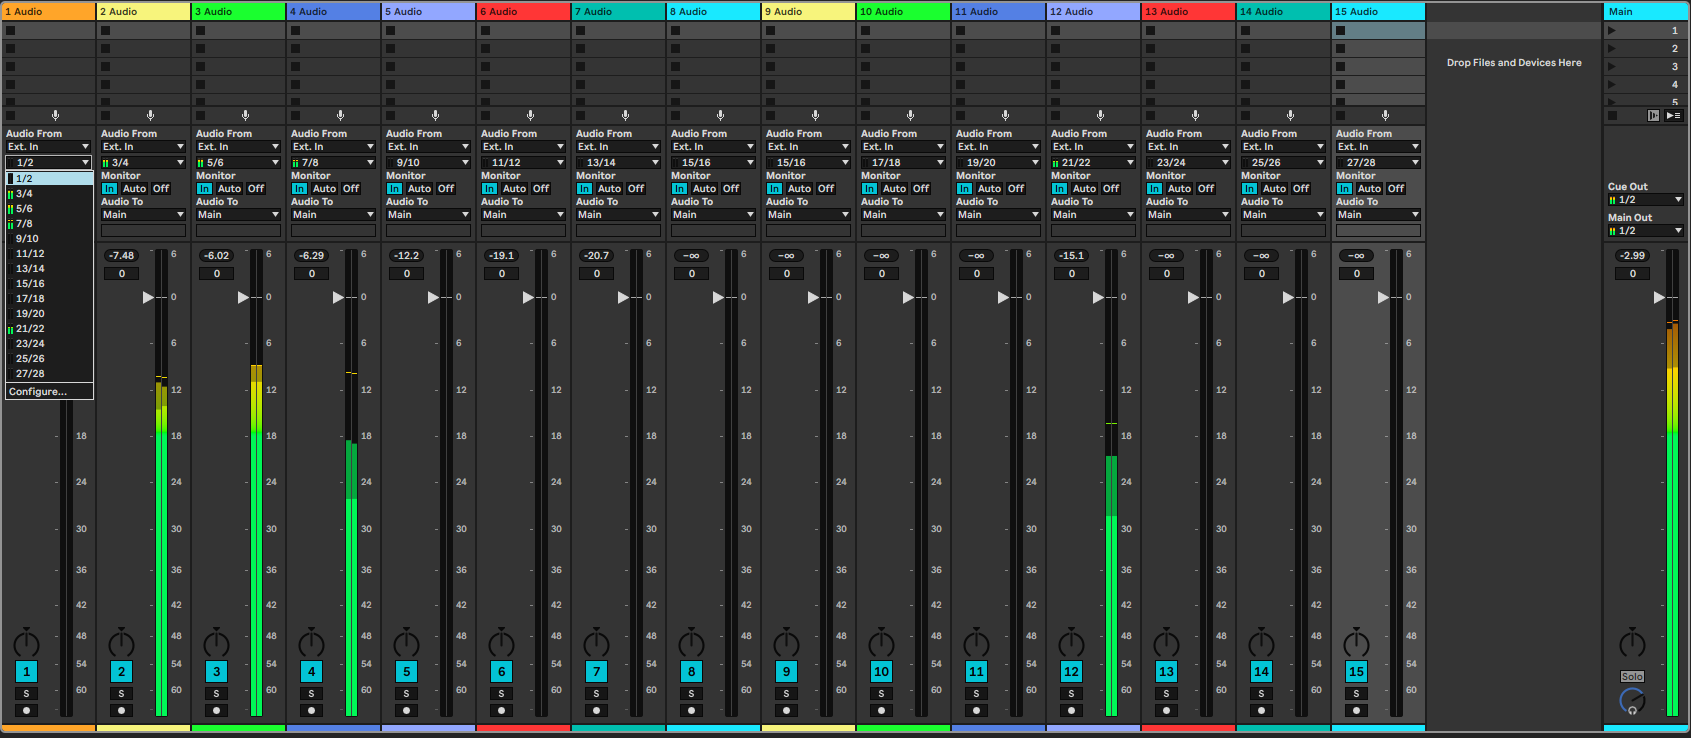
.
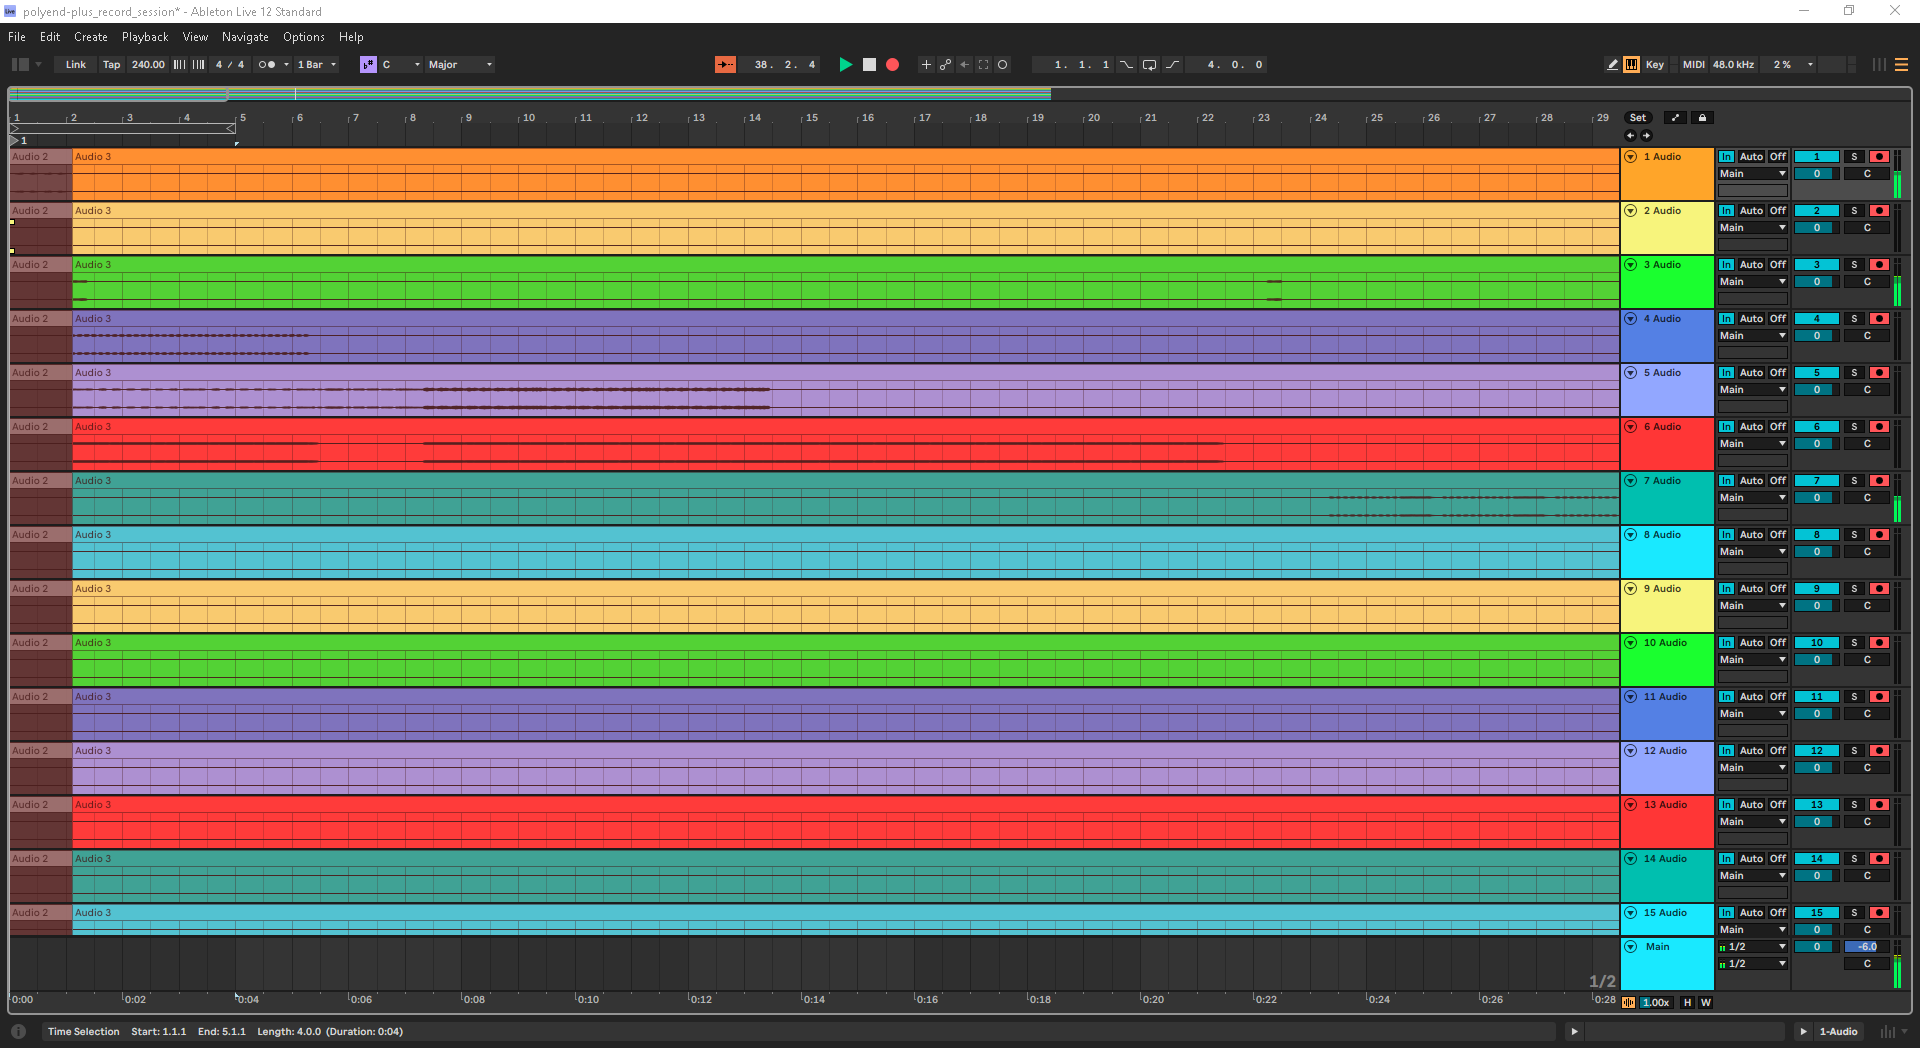
don’t forget to activate recording for each track you create, and you’re ready to record your polyend tracker+ in Ableton Live.
Bitwig Setup
In the Bitwig Audio Settings make sure to use ASIO as Driver Model.
Open the Device Dropdown and there you should find your VASIO device:

Map your channels according to your requirements.
Here is an example based the Tracker+ and what we have created up to this point:

With this all setup, you should be able to multitrack to your hearts content:

Additional Details / Tips
Matrix offers a couple options that i find extremely useful.
You can find most of them through or in the Burger Menu:

- System Tray: this will minimize Matrix into the Tray when you close it
- Show App on Startup: If you are like me and don’t want to run Matrix all the time, this is useful for when you do start it, as you most likely want to see it and or change something immediately.
- Save Settings: You can create different setups/settings and save them and load them at any time. Very useful if you have lots of different setups you might want to play with.
Settings
The settings include a couple useful features:

By clicking on Click here to edit USERNAME, you can define a custom name for your devices.
Currently this is only shown in the main screen, but hopefully in the future this will also be reflected in the Matrix View as it should make it easier to identify your devices.
Another useful feature is the Delay. This allows you to set a delay on the audio coming from your device. Allowing you to sync things up between various devices from within Matrix without having to deal with Delay Compensation settings in your DAW.
CTRL + Left-Click enables/disables Delay. A simple Left-Click will allow you to define the delay in milliseconds.
Main Window
When hovering over something in the Main Window, you will get a short description on the top right of the window:

Hover over a couple things to see what extra functionality exists. Some are very handy shortcuts.
Matrix Window
- Don’t sleep on creating presets. It’s very handy to quickly change things up.
- You can also load/save routings
- Check out the options for some customization options for that screen.
Where to next
What do you mean!? Now go an create some tunes! ![]()
- If you ever need any help with VB-Matrix feel free to post a question in this topic.
- And if you want professional help
 , go check out the VB-Audio’s Discord.
I hope this guide was helpful to you and if so, feel free to leave a ![]() .
.